
How To Build Your Own Indoor Medical Marijuana Garden
Welcome back to our series aimed at teaching what you need to know to grow quality medical marijuana reliably, effectively and safely indoors using grow lights and climate control.
In site selection we talked about the importance of things like providing a safe and secure location to keep the growing activities on the down low. We also talked about making sure there was easy and safe access to ample water and electricity. Since that’s out of the way, we can start to build our indoor garden.
Cultivation Environment: Grow Tent vs. A Room Within A Room
Safety is always a priority, and luckily for home growers, the equipment used for growing indoors has become very user friendly. It is relatively plug and play – a far cry from the technology that existed only ten years ago, where you’d be expected to do some wiring and even a little bit of light construction.
If you are growing a mid-sized garden or smaller (up to 6 lights), you may not have to do much in the way of actual building at all. In situations like this, grow tents are recommended. They work great and are an inexpensive alternative to traditional grow room construction, where more permanent modifications are made to an existing area/room within a building, or even an underground bunker in extreme instances.
“If you aren’t able to set up your grow tent in a quiet, secluded place (ex. a basement), you might consider the ‘room within a room’ approach.”
Larger scale gardens can also be constructed using grow tents. However, most commercial growers prefer to build one larger, more permanent finishing room. This allows for easier movement and handling of plants, materials, etc.
A grow tent is like it sounds: it begins with a series of metal poles that connect together to make a sturdy frame. A special covering that reflects light back to plants while keeping light from escaping to surrounding areas typically slides over to complete the enclosure – it can be accessed with zippered openings. There are adjustable ports in the covering for air ducting, electric cables, and the frames will typically support light-weight growing equipment when the weight is secured and distributed evenly through the frame.

Things To Consider When Searching For A Grow Tent
- Will it fit? Actual measurements are one thing, but don’t forget you need working space to put it together within the room, plus room to walk around the tent for construction and access later on. There is a European “Modular” design that allows for construction in very tight places and custom shapes.
- Quality – Don’t skimp out. The zippers, for example, will need to get opened and closed often. The metal supports and connectors need to be strong and corrosion resistent.
- NON-TOXIC! – It’s usually not problem anymore, but occasionally there is off gassing from white coverings (vinyl additive) that really hurts plants. Any of the reputable manufacturers should be able to offer a guarantee in this regard
- Leak proof, in respect to both light and water – Poorly fabricated grow tents will bleed light out at stitching points and zippered areas; superior models keep it dark outside, no matter how bright the lights are inside.
The grow tent will keep bright light contained and prevent leaks onto the floor if used as intended. However, it will not keep sound contained and will not typically support the weight of heavier items like carbon filters, air cooled fans, de-humidifiers, etc. If you aren’t able to set up your grow tent in a quiet, secluded place (ex. a basement), you might consider the “room within a room” approach.
How To Prepare A Room Within A Room For Cannabis Cultivation
If you need to go the route of a room within a room, you’ll probably want to do some sound proofing and minimize any potential damage from accidental spills, etc.
- Roll up the carpet and under pad. If you have wooden flooring, secure a heavy duty water proof covering like pond liner with some upper lip (about 4-6”) around the perimeter using wood strips and screwing them into stud members. The grow tent has a heavy duty water proof floor cover, but the laws of chaos may prevail – protect the property from damage.
- Make sure there are no electrical cords on the floor. You can secure them to walls with conduit straps or make your own by re-purposing a plastic milk jug into strips you can bend and screw down to hold cords off the ground.
- Make sure the windows are covered and secure. This will help prevent light from leaking out, and is a defence against easy access from theft or vandalism. Seal windows with vapor barrier to prevent condensation from occurring.
- Insulate for sound and to improve cooling efficiency. In multi-story buildings, gym mats are awesome for deadening sound and don’t draw attention coming into the building. Styrofoam sheets secured with Velcro, double sided tape, fasteners with washers or appropriate adhesive come down easily without leaving much of a mark. Don’t forget the ceiling—sound can really travel.
Lighting, Air Conditioning, Fans, and More
Before you start building, it’s best to consider important things like how much yield you desire, how many plants you will use to do it (the more plants, the quicker you can cycle; space fills fast), and how many and what type of grow lights it will take to accomplish all of this.
In a nutshell, experienced growers work backwards from what they want to achieve to how they will get there and what steps it will take.
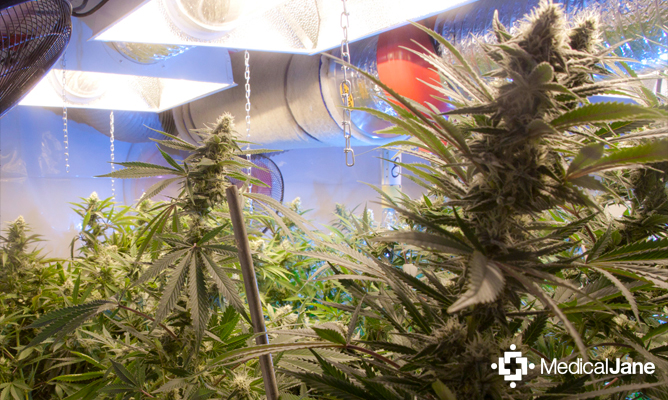
Lighting
Most artificial light sources used for indoor growing emit quite a bit of heat, while supplying cannabis plants with tailored grow lighting spectrum for the perfect day, every day in your grow room. It’s good to be efficient when it comes to lighting.
With the pricing and availability of common grow light kits like high pressure sodium (HPS) and metal-halide (MH) being what they are, new growers are more likely to OVER-DO rather than under illuminate their crops. The old rule of thumb still works: use 600-1000W of high intensity discharge (HID) lighting per square meter of garden space.
Other viable sources of grow lighting have been developed to produce more light for less power, customized light spectrums for plant growth or resin production, and more. A few examples of these include: Induction, LED and Plasma grow lights.
One thing many new gardeners fail to consider is lamp replacement costs. It is recommended HPS or MH grow lamps get replaced at leats once a year. Not only does this expense add up over the years, the lights contain things like mercury and lead that often end up in the landfill. Alternative grow light sources seldom need replacing, if at all.
Ventilation
Lighting and ventialtion are two areas are very tightly connected to each other in operating a grow room both successfully and efficiently. Keep in mind to prevent becoming over zealous with your lighting purchase. All that lighting will actually hurt more than it will help if you don’t have enough in the budget to ventilate properly.
“Around 450 CFM (Cubic Feet Per Minute fan rating) of ventilation from a furnace style or centrifugal fan for exhaust is required per 1000 watts of HID grow lighting.”
It’s like this: higher yield target –> more grow lighting –> increased heat that needs to be managed –> adequate ventilation to remove heat or industrial-style air conditioning (recommended).
As a rule of thumb, around 450 CFM (Cubic Feet Per Minute fan rating) of ventilation from a furnace style or centrifugal fan for exhaust is required per 1000 watts of HID grow lighting, and about 2/3rds in the equivalent of grow room air intake with the same type of fan. A good grow room fan can get the job done, but there are some serious limitations to think about if you are growing with more than a light or two. If you have more than 12′ feet of ducting on either side of the fans, and chances are you will, you may need to step things up.
Centrifugal fans are good for mid-sized grows. Many people don’t realize that the biggest advantage these fans hold is that you can place more than one inline on the same ducting, and it will considerably improve the situation while not doubling the Cubic Feet per Minute per Air Movement.
This allows you to keep the same sized diameter ducting and add or remove as many of the same sized centrifugal fans as needed to keep the growing environment from overheating. Cannabis crops grown in temperatures above 85° F typically yield poorly with considerable more work required for lower quality buds.
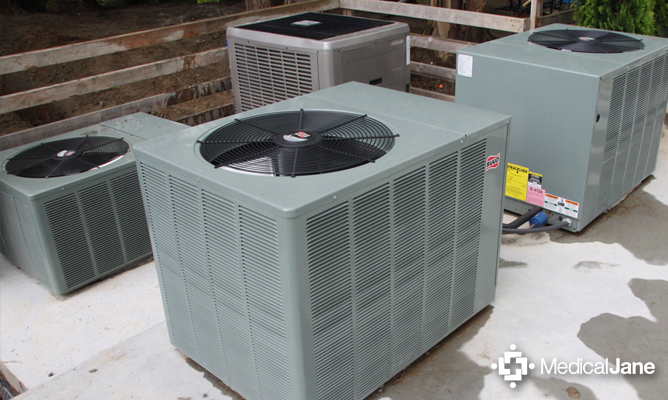
Cooling and Air Conditioning
Moving lots of air can be noisy, but next we’ll talk about some proven tips and tricks that help keep things quiet and cool. If you are serious about growing your own cannabis as quality medicine, a good air conditioner is a sound investment – especially if you are located in an area that stays over 75° F at night in the summer months. You will be able to grow year round in the near-perfect climate each and every day.
Your crops will often yield better product, more quickly when you grow in a “sealed” or CEA grow set up. No outside air exchange is required in this method, and it can improve upon the security factor of your indoor medicinal bud garden.
Without air conditioning, it may not be possible to keep a grow room using HID lighting cool enough to operate successfully during summer months. Vent fans, even in the best installs will still have a 10-15° F increase in air temperature versus outside air temperatures when the lights are running. And we haven’t even talked about sucking in humidity, insects and fungal spores through the intake, or blasting out hot humidified air that may smell offensive to others.
Of further credit to air conditioners is their ability to remove moisture from the air that has been transpired through the crop from water uptake. In doing so, just like a de-humidifier, condensate is captured and drained. This is pure gold for irrigation purposes when it comes to growing…there will be more on that topic later in our series here at Medical Jane.
The rule of thumb for air-conditioning is to have about 3750 BTUs per 1000W of grow lighting in a sealed environment. This accounts for other sources of heat like co2 generators and some ballast heat. Machines rarely operate at 100% efficiency, so it’s better to over-shoot in this area rather than hope you can squeak by with a lower rated model for less money. There are a lot of choices when it comes to ACs and it will pay to do some research; window style ACs typically aren’t going to fit the bill for growing purposes.
Keep in mind that running a CEA environment also means you can add Carbon Dioxide (CO2) to boost plant growth rates and yields efficiently. With vent fans, any extra CO2 added to the environment for improving the crop will quickly get evacuated out of the room as the fans struggle to keep the lights on temperatures tolerable for your medicinal plants.
Air Quality
Air quality plays a very big role in the how healthy and happy your plants can be. Buds grown and harvested in poor air quality conditions are susceptible to infections from bacteria or fungi. In medical marijuana gardens, this can be the kiss of death.
CEA growers rarely have problems with insects or diseases, because air quality is always maintained at optimal levels. Otherwise, erratic temperatures, poor air movement, and excessive humidity are just a few of the issues that can occur. These also happen to be the doorways for common plant diseases, as pooled moisture on leaves or buds is a sure ticket for problems like bud rot.
Just like you, your plants will look, feel and perform better in good quality air. For plants that means paying attention to these critical areas, for starters:
- Air circulation – Oscillating or industrial style air circulation fans keep the air stirred up in the grow room so temperatures and humidity levels remain even and don’t wind up in “pockets” in either the plant canopy or surrounding air in the grow area. They also encourage stronger and sturdier plants with reduced stretching that can take in more co2, while encouraging more water and mineral uptake; they discourage insects too. You can get a lot of bang for your buck by ensuring you have lots of air movement in the grow room.
- Humidity – Healthy, fast-growing crops can put out a lot of moisture through the leaves. This will need to be managed in an indoor growing environment. Air conditioning removes lots of moisture from the air when operating; typically during the lights on-cycle to keep the room cool. De-humidifiers add some heat to the air but can do a good job of removing excess humidity. You will almost surely need one for the dark cycle no matter what your growing style. Like ACs, they happen to be a good source of captured condensate (from the water lost to the air in the grow room via plants) for irrigation too.
- Carbon Dioxide – At the very least, you will need to keep a healthy exchange of air to keep up CO2 levels. Plants strip carbon from the air during the growing process, and give back oxygen; they hardly grow without CO2. Supplementing co2 in either vented or CEA medicinal gardens is like adding a turbocharger for growth rates and yields. CO2 boosts for growing are easier to maintain consistently and efficiently in sealed growing environments versus fan vented.
- Cleanliness – We all love to breathe clean air that is free of dust, spores and other airborne contaminants or irritants. So do your cannabis plants. You don’t want to be smoking dust or soil particles that have been swirling around the growing environment with nowhere else to go. Activated carbon filters are usually the best choice, and need to be carefully paired to your CFM capacity to work properly. In sealed or CEA grows they circulate the air 24/7 trapping anything but fresh air; it’s a great way to rid the room of unwanted odors. EVERY indoor grow should have t least one carbon scrubber. You’ll be hard pressed to find anything more reliable when used properly.

Electrical & Controls
You are relying on all of the aforementioned electrical appliances to do their job. If they don’t, your crop could suffer or even fail completely. One example of this would be if your ventilation and/or AC failed for an entire lighting period unnoticed and HID lamps were running as usual.
Thankfully for contemporary indoor growers, grow room automation equipment is widely available. There is lots to choose from in terms of sophistication and price. No matter how big or small your indoor bud garden is going to be, your really should have all of the following.
Must Haves
- Cooling thermostat
- Lighting control relay and timer
- High temperature shut down (“Chernobyl switch”)
- Reliable max/min temp and relative humidity monitor
Recommended
- Humidity controller
- Night/day temperature control
- Carbon dioxide monitor & control
Best
- Grow room automation package (similar to home automation and monitoring)
Death By A Thousand Cuts
You might be amazed on how much you spend on stuff from the building center or hardware store for things like extension cords, hardware, fasteners, plumbing fittings, duct work, adhesives, tapes, poly sheets, hand tools, power tools, smoke detectors, security systems….the list goes on. Spend some time thinking about how it’s all going to fit together, and what you will need to connect it all up into a reliable and productive indoor bud garden that isn’t going to be a source of continued hassles or failures.
If you don’t have the budget to do it all at once, gather the materials over time before you start growing. Otherwise you run the risk of wasting your time and money in your quest to grow the highest quality medical marijuana that meets your tastes and needs to perfection.
For the next segment of this series, we are going to talk about the first step in getting started – propagation and/or pre-vegging of young plants.

Erik Biksa has been writing about and discussing hydroponics growing, related technologies and cropping methods since 1999 in a variety of professional publications and platforms globally Erik has travelled the world learning and teaching modern …